Access Tracking and Sign-on Audit
본 문서는 Oracle E-Business Suite에 있는 Access Tracking 및 Sign-on Audit을 할 수 있는방법에 대해 설명한다.
이 기능을 이용하면 일자별, 사용자별, 서버별, 프로그램별, 페이지별 등으로 접속 및 사용에대한 현황을 알 수 있다.
해당 기능에 관련된 내용은 My Oracle Support의 다음 Note를 참고하면 상세한 정보 및 최신의 변경 가능을 알 수 있다.
Note 402116.1 - Page Access Tracking in Oracle Applications Release 12
Introduction
Page Access Tracking 기능은 administrators 권한으로 수행할 수 있으며, Application의 사용통계 및 웹사이트의 트래픽 분석을 위해 사용할 수 있다.Page Access Tracking administration 화면에서는 다음의 작업을 할 수 있다.
- Enable and disable Page Access Tracking
- Configure the granularity to which application context information is captured
- View reports on the gathered data
다음과 같은 보고서를 조회할 수 있다.
- Access reports for a given application, responsibility and/or user across the Oracle Applications Framework, JTF, and Forms tech stacks
- Page Performance reports per mid-tier node
- Page access flow chart for a given user session
- Search reports based on several filter criteria
Configuring Page Access Tracking
Page Access Tracking 사용을 위해서는 아래와 같은 절차로 설정을 해주어야 한다.
2.1 Navigating to the UI
설정을 위해서는 System Administrator 권한이 있는 계정을 사용하여 로그인 한다.
로그인 후 다음의 Navigation Path를 통해 해당 관리화면으로 이동한다.
Oracle Applications Manager: Site Map > Monitoring > Applications Usage Reports > Page Access Tracking and Sign-on Audit Configuration

Turning Page Access Tracking On or Off
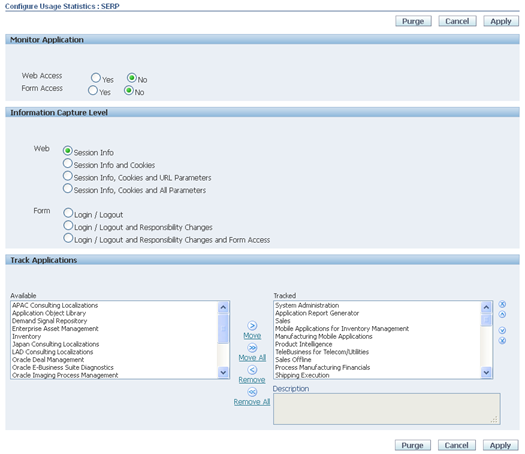
본 기능의 활성화를 위해서는 아래 그림과 같이 해당 기능을 활성화 해주어야 한다.Web Access는 OAF, JTF기반의 Web Application을 의미하고, Form Access의 경우Forms에 대한 설정을 의미한다. 각각의 값을 Yes로 설정하면 Access Tracking 기능이 활성화 된다.Configuring Logging for Responsibilities or Users (Optional)
아래 그림과 같이 로깅정보의 수준을 설정할 수 있다. 상세한 정보수집을 위해 Form의 경우 "Login/Logout and Responsibility Changes and Form Access"를 선택한다.Web의 경우 Session Info만 수집한다. 다른것들을 선택하면 너무 많은 정보가 수집되어성능저하가 발생할 수 있다.참고로 Forms의 경우 JTF_PF_ENABLED Profile Option 값으로 설정된다. (Application별로 저장)Choosing the Applications to Log
Access 로그를 저장할 대상 Application을 선택한다. 모든 대상을 선택하여도 되고 필요한대상만을 선택하여도 된다. 가급적이면 전체를 선택하도록 한다.Applying Your Changes
설정 후 Apply 버튼을 눌러 설정한 값을 저장한다. 아래 메시지와 같이 반드시 JVM 서비스를 재구동하여야만 해당 설정이 유효하다.3. Migrating Page Access Tracking Data
위의 절차로 Page Access Tracking 기능을 활성화 하면 JTF_PF_REPOSITORY 테이블에모든 정보가 저장이 되며 저장되는 정보는 다음과 같다.
- Session Information
- Page Information
- Time stamp
- JSP name (for example, jtflogin.jsp)
- JSP execution time, in milliseconds
- Server Host Information
- Host name
- Apache port
- Jserv port
- Request method (POST, GET, PUT, HEAD, etc.)
- Return status (OK, Error, or Exception)
- Session Context
- Application ID
- Responsibility ID
- User ID
- Language ID
- Session ID
- Client Browser Information
- Client language
- HTTP header
- User-agent
- Protocol
- Referer
- Authorization type
- Client Language Information
- Character encoding
- Language
- Character set
- Session Information and CookiesThis includes session information plus all incoming cookies.
- Session Information, Cookies, and URL ParametersThis includes session information, all incoming cookies, and any GET parameters.
- Session Information, Cookies, and All ParametersThis includes session information, all incoming cookies, any GET parameters, and any POST parameters.
하지만 이 데이터들을 이용하여 직접적으로 조회하기는 어렵기 때문에 변환작업을 해 주어야 한다. (대부분의 Column들이 Object Type으로 되어 있으며, Low Level 데이터이므로 이데이터를 이용한 직접적인 분석은 쉽지 않다)
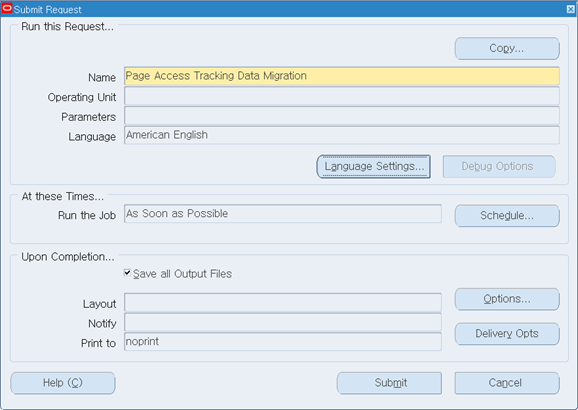
변환작업을 위해서 다음의 Cuncurrent Program을 수행한다. (System Administrator 권한에서 수행)
Program Name: Page Access Tracking Data Migration

가급적이면 Schedule 작업으로 등록하여 처리해 주면 좋다. (1일 1회가 적당함)
4. Viewing Page Access Tracking Reports
Page Access Tracking 보고서 사용을 위해서는 다음과 같은 절차로 조회하면 된다.
Locating the UI
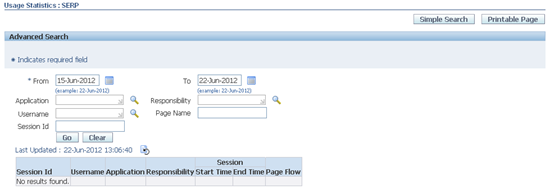
System Administrator 권한이 있는 계정을 사용하여 로그인 한다.로그인 후 다음의 Navigation Path를 통해 해당 관리화면으로 이동한다.Oracle Applications Manager: Site Map > Monitoring > Applications Usage Reports > Page Access Tracking and Sign-on Audit ReportsViewing Reports and Report Details
상세한 조건으로 검색하기 위해서는 Advanced Search를 이용할 수 있다.5. Setting the Flush Interval and Maximum Buffer Size
Page Access Tracking data is buffered within each JVM and periodically asynchronously flushed to the database. The flush is triggered by the following site-level profiles:
- JTF_PF_FLUSH_INTERVAL, which defines a time interval. The default value is 120 seconds.
- JTF_PF_BUFFER_SIZE, which defines the maximum number of page log accesses in the buffer. The default value is 20 accesses.
The data is flushed to the database when the specified time interval is reached, or when the number of page log accesses exceeds the configured buffer size. These parameters can be modified from their default values through Oracle Forms. The default values are used if the profiles are not set.
6. Purge Page Access Tracking Repository
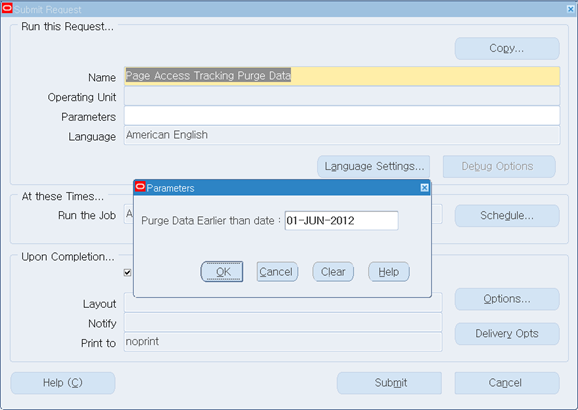
Page Access Tracking 설정에 따라 많은 양의 정보들이 수집되기 때문에 일정시간이 경과되면 과거의 데이터들은 삭제를 해야 한다. 이를 위해서 다음의 Cuncurrent Program을 수행한다. (System Administrator 권한에서 수행)
Program Name: Page Access Tracking Purge Data
Parameter: Purge Date (해당 날짜 이전의 데이터가 삭제됨)

가급적이면 Schedule 작업으로 등록하여 처리해 주면 좋다. (1일 1회가 적당함)
Appendix
Table Lists
본 작업과 관련된 Table 목록인다.
아래 Table을 이용하여 직접 Access 내용을 조회할 수 있다.
- JTF_PF_PURGEABLE
- JTF_PF_REPOSITORY
- JTF_PF_REPOSITORY_TMP
- JTF_PF_LOGGING_TABLE
- JTF_PF_LOGICAL_FLOWS
- JTF_PF_TMP_ACTIVITY
- JTF_PF_ANON_ACTIVITY
- JTF_PF_HOST_SUMM
- JTF_PF_PAGE_SUMM
- JTF_PF_SESSION_SUMM
- JTF_PF_SES_ACTIVITY
- JTF_PF_APP_SUMM
- JTF_PF_USER_SUMM


댓글 없음:
댓글 쓰기